
Reference
Annotation commands
Use these commands to add an annotation. A new annotation goes to the step on screen. See Annotations. Press : to open the command line. Type the command. Press Enter. The arguments, such as L:TEXT and A-B, are in Arguments.
Each image on this page is a frame of a tiza render export. The code is examples/ownership.rs. Each frame shows only the lines that it needs.
effect=E sets the enter effect of the new annotation: draw or fade. See Enter effects.
Tiza puts a label, a legend or a note in the right margin when the margin has room. When it has no room, Tiza puts it under the line. The frames on this page are narrow, so their labels are under the line.
- Under the line, the label of a highlight or a mark starts under its span when it fits there.
- The label of an arrow that goes to another line is beside the code of that line, after the glyph of the arrow, when the code column has room for it. When it has no room, the label goes in the right margin or under the line.
:mark
Adds a mark on a span of code. The mark has a glyph, a legend and your label.
:mark KIND L:TEXT [LABEL] [emphasis=E] [effect=E]emphasis=E-
How Tiza draws the span.
fill(default) |underline|brackets|strike
KIND is a built-in kind, an alias, the name of a style, the name of a personal style of the config file, or a glyph. The kinds are in Kinds.
For example, mark takes on line 3 with the move kind:
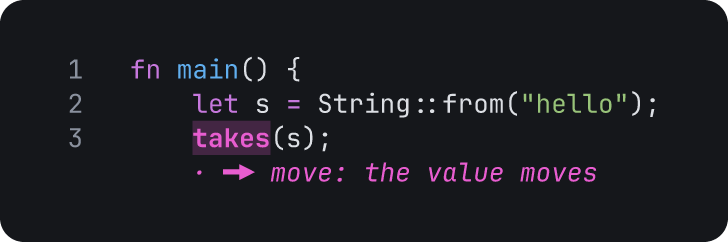
examples/ownership.rs, lines 1 to 3
:mark move 3:takes the value movesOpen lines 1 to 3 of examples/ownership.rs: tiza examples/ownership.rs:1-3 --no-save. Then type the commands.
:mark with a color
KIND@COLOR sets the color of the mark. The colors are in Color names.
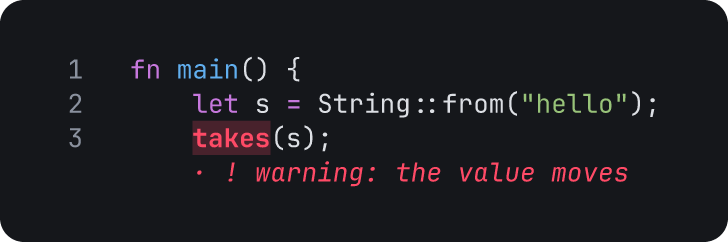
examples/ownership.rs, lines 1 to 3
:mark warn@red 3:takes the value movesOpen lines 1 to 3 of examples/ownership.rs: tiza examples/ownership.rs:1-3 --no-save. Then type the commands.
:mark with an emphasis
The frames of the other values are in :hl with an emphasis.
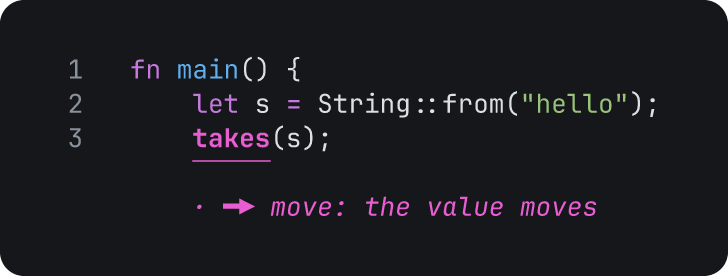
examples/ownership.rs, lines 1 to 3
:mark move 3:takes the value moves emphasis=underlineOpen lines 1 to 3 of examples/ownership.rs: tiza examples/ownership.rs:1-3 --no-save. Then type the commands.
:mark with a glyph
A glyph in place of KIND makes a style for this mark only. Tiza uses the label as the legend. A glyph is one or two columns wide. It has no ASCII letter or digit.
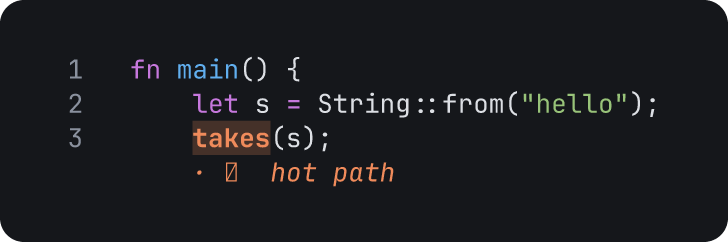
examples/ownership.rs, lines 1 to 3
:mark 🔥 3:takes hot pathOpen lines 1 to 3 of examples/ownership.rs: tiza examples/ownership.rs:1-3 --no-save. Then type the commands.
Notes on :mark
- The anchor ends at the first space. To mark text that has a space, select it with
vand pressm. See Annotate a selection. - After you press
mon a selection,:markuses the selected text. Then type only the kind and the label.
:hl
Adds a highlight and your label on a span of code.
:hl L:TEXT [LABEL] [emphasis=E] [effect=E]emphasis=E-
How Tiza draws the span.
fill(default) |underline|brackets|strike
For example, highlight &t on line 7:
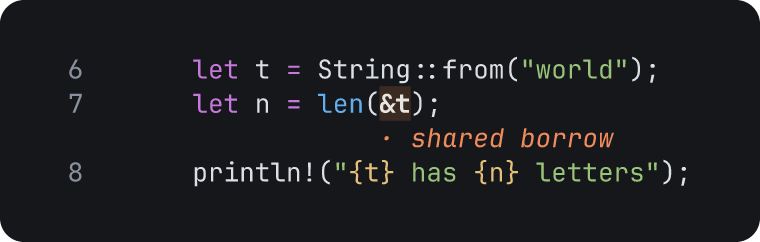
examples/ownership.rs, lines 6 to 8
:hl 7:&t shared borrowOpen lines 6 to 8 of examples/ownership.rs: tiza examples/ownership.rs:6-8 --no-save. Then type the commands.
:hl with an emphasis
underline draws a line under the span:
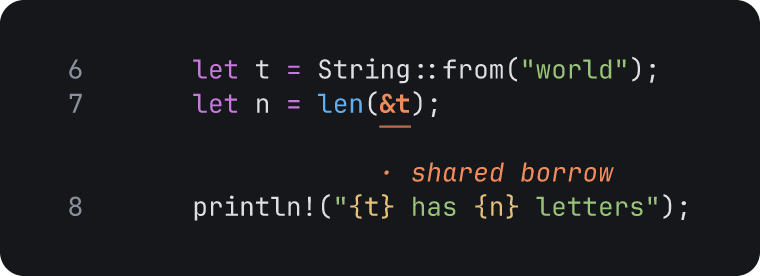
examples/ownership.rs, lines 6 to 8
:hl 7:&t shared borrow emphasis=underlineOpen lines 6 to 8 of examples/ownership.rs: tiza examples/ownership.rs:6-8 --no-save. Then type the commands.
brackets draws two corners under the span:
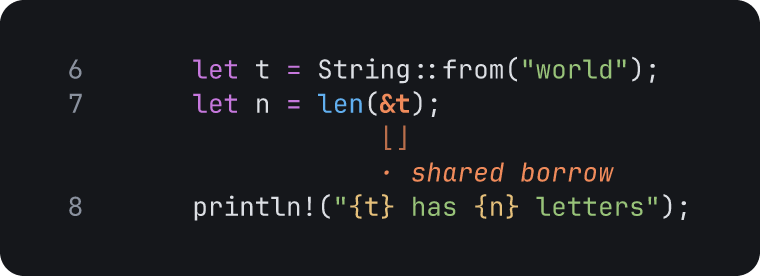
examples/ownership.rs, lines 6 to 8
:hl 7:&t shared borrow emphasis=bracketsOpen lines 6 to 8 of examples/ownership.rs: tiza examples/ownership.rs:6-8 --no-save. Then type the commands.
At the end of the longest line, the code column has no space after the span. Then the brackets go under the span, ⌊ under its first character and ⌋ under its last:
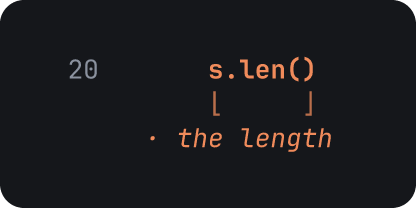
examples/ownership.rs, line 20
:hl 20:s.len() the length emphasis=bracketsOpen line 20 of examples/ownership.rs: tiza examples/ownership.rs:20-20 --no-save. Then type the commands.
strike draws a line through the span:
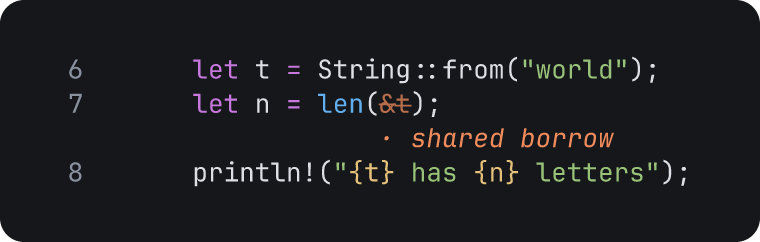
examples/ownership.rs, lines 6 to 8
:hl 7:&t shared borrow emphasis=strikeOpen lines 6 to 8 of examples/ownership.rs: tiza examples/ownership.rs:6-8 --no-save. Then type the commands.
Notes on :hl
- The anchor ends at the first space. For example,
:hl 2:let s two wordshighlightslet. Its label iss two words. - To highlight text that has a space, select it with
vand pressh. :hlalso acceptsstyle=as another name foremphasis=.
:arrow
Adds an arrow from one span to another span, with your label.
:arrow L:TEXT L:TEXT [LABEL] [stroke=S] [route=R] [heads=START,END] [effect=E]stroke=S-
The line of the arrow.
solid(default) |dashed|dotted|thick|double route=R-
The corners of the line.
rounded(default) |sharp heads=START,END-
The head at the start and the head at the end.
heads=ENDsets only the end head.none|arrow|dot|bar|openDefault:
none,arrow. start=H,end=H-
One head: the head at the start, or the head at the end.
The values of
heads.
Each end is the first character of its text. For example, draw an arrow from s on line 2 to s on line 3:
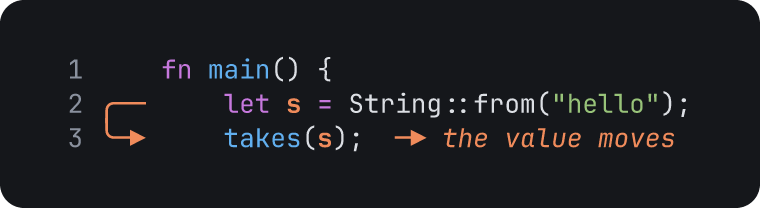
examples/ownership.rs, lines 1 to 3
:arrow 2:s 3:s) the value movesOpen lines 1 to 3 of examples/ownership.rs: tiza examples/ownership.rs:1-3 --no-save. Then type the commands.
A dashed arrow that starts with a dot:
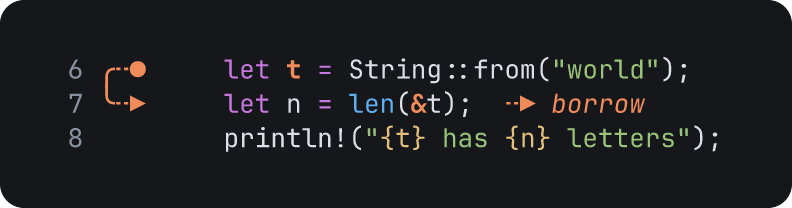
examples/ownership.rs, lines 6 to 8
:arrow 6:t/2 7:&t borrow stroke=dashed heads=dot,arrowOpen lines 6 to 8 of examples/ownership.rs: tiza examples/ownership.rs:6-8 --no-save. Then type the commands.
A thick arrow with sharp corners:
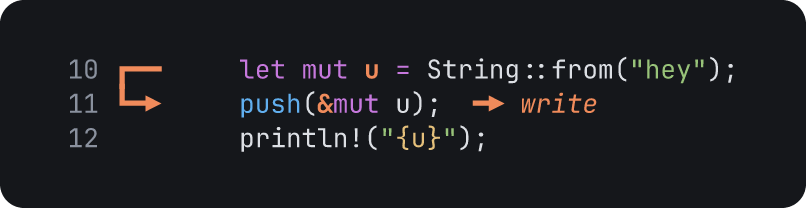
examples/ownership.rs, lines 10 to 12
:arrow 10:u/2 11:&mut write stroke=thick route=sharpOpen lines 10 to 12 of examples/ownership.rs: tiza examples/ownership.rs:10-12 --no-save. Then type the commands.
An arrow with an open head at its start and no head at its end:
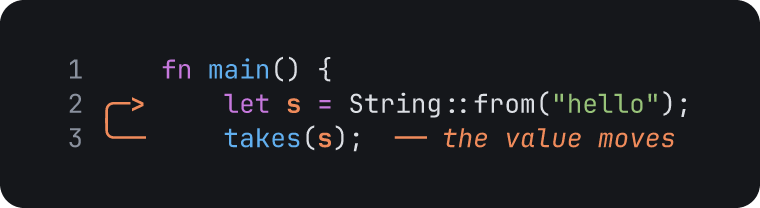
examples/ownership.rs, lines 1 to 3
:arrow 2:s 3:s) the value moves heads=open,noneOpen lines 1 to 3 of examples/ownership.rs: tiza examples/ownership.rs:1-3 --no-save. Then type the commands.
Notes on :arrow
- An end can also be
.:TEXT, the firstTEXTon the cursor line. It can also beLorL:, the start of lineL. It can also beTEXTalone, the firstTEXTin the code.
:box
Adds a box with your label around lines.
:box A-B [LABEL] [border=S] [corners=R] [fill=F] [effect=E]border=S-
The line of the border.
solid(default) |dashed|dotted|thick|double corners=R-
The corners of the box.
rounded(default) |sharp fill=F-
The tint inside the box.
yes(default) |no
For example, put a box around lines 6 to 8:
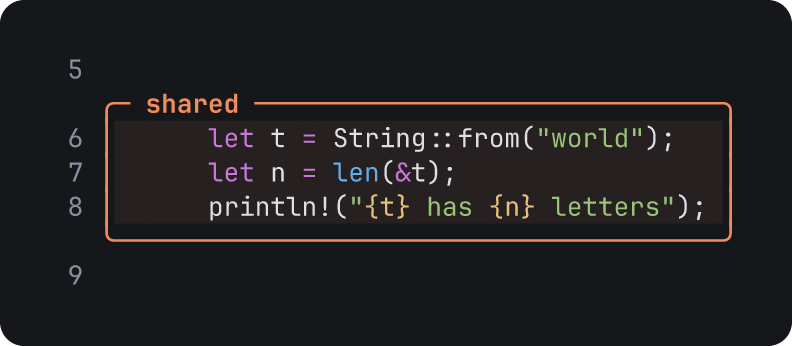
examples/ownership.rs, lines 5 to 9
:box 6-8 sharedOpen lines 5 to 9 of examples/ownership.rs: tiza examples/ownership.rs:5-9 --no-save. Then type the commands.
A box with a double border, sharp corners and no tint:
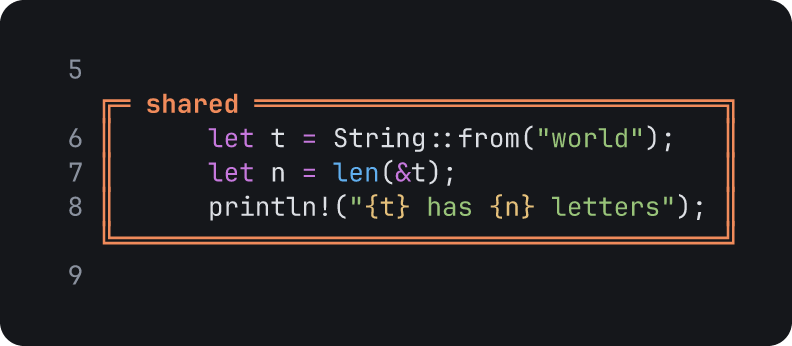
examples/ownership.rs, lines 5 to 9
:box 6-8 shared border=double corners=sharp fill=noOpen lines 5 to 9 of examples/ownership.rs: tiza examples/ownership.rs:5-9 --no-save. Then type the commands.
:box with two markers
A range of two markers finds the lines from their text. Tiza keeps the two markers in the document. It finds the range again after the code changes.
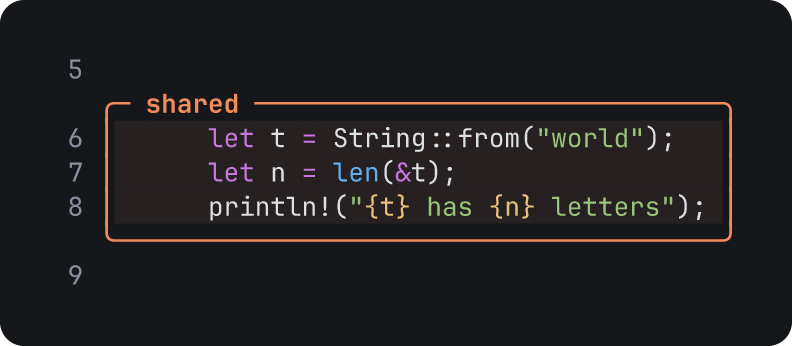
examples/ownership.rs, lines 5 to 9
:box @'let t'..@'println' sharedOpen lines 5 to 9 of examples/ownership.rs: tiza examples/ownership.rs:5-9 --no-save. Then type the commands.
Notes on :box
- A range can also be
A..BorA:B. Write it without spaces. :box .uses the cursor line as the range.- Put a marker in
'or"quotes when it has a space.
:note
Adds a note, a line of text, for a line of code. Tiza draws the note in the right margin when the margin has room. When the margin has no room, Tiza draws the note under the line, as in this frame.
:note L TEXT [effect=E]For example, add a note on line 3:
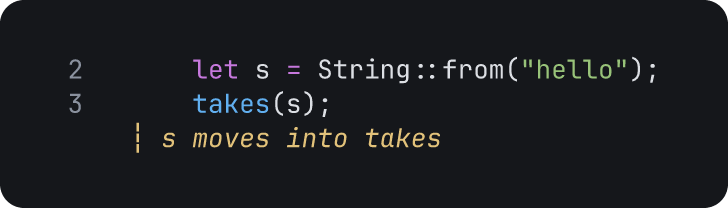
examples/ownership.rs, lines 2 to 3
:note 3 s moves into takesOpen lines 2 to 3 of examples/ownership.rs: tiza examples/ownership.rs:2-3 --no-save. Then type the commands.
When the terminal is wider, the right margin has room, and the note goes there:

examples/ownership.rs, lines 2 to 3
:note 3 s moves into takesOpen lines 2 to 3 of examples/ownership.rs: tiza examples/ownership.rs:2-3 --no-save. Then type the commands. The image is 64 columns wide.
Notes on :note
- A note needs text.
Lcan be., the cursor line.
:callout
Adds a callout, a paragraph of text, for lines of code.
:callout A[-B] [@PLACE] [title="TEXT"] TEXT [border=S] [corners=R] [fill=F] [effect=E]@PLACE-
Where the callout goes.
@margin(default) |@below|@auto title="TEXT"-
A title for the callout. Put it before the text.
border=S-
The line of the border.
solid(default) |dashed|dotted|thick|double corners=R-
The corners of the callout.
rounded(default) |sharp fill=F-
The tint inside the callout.
no(default) |yes
For example, add a callout for lines 6 to 8:

examples/ownership.rs, lines 6 to 8
:callout 6-8 t stays with main.Open lines 6 to 8 of examples/ownership.rs: tiza examples/ownership.rs:6-8 --no-save. Then type the commands. The image is 66 columns wide.
When the right margin has no room, Tiza puts the callout under the lines.
:callout with a place and a title
@margin puts the callout in the right margin. @below puts it under the lines. @auto puts it where there is room.
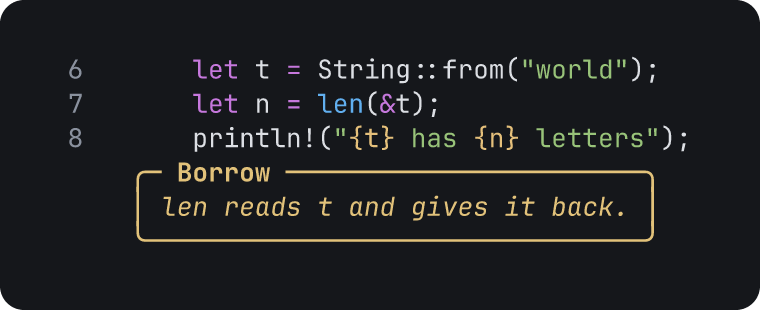
examples/ownership.rs, lines 6 to 8
:callout 6-8 @below title="Borrow" len reads t and gives it back.Open lines 6 to 8 of examples/ownership.rs: tiza examples/ownership.rs:6-8 --no-save. Then type the commands.
A callout with a tint and a dashed border:

examples/ownership.rs, lines 6 to 8
:callout 6-8 t stays with main. fill=yes border=dashedOpen lines 6 to 8 of examples/ownership.rs: tiza examples/ownership.rs:6-8 --no-save. Then type the commands. The image is 66 columns wide.
Notes on :callout
- A callout needs text.
:callout .uses the cursor line. A range can also beA..BorA:B. See Arguments.
:spot
Adds a spotlight. At its step, Tiza dims the code and the annotations outside the lines. Tiza does not dim an annotation that you name, or its code.
:spot A-B [ID…] [effect=E]
:spot ID… [effect=E]
For example, highlight &t, then put a spotlight on lines 7 and 8:
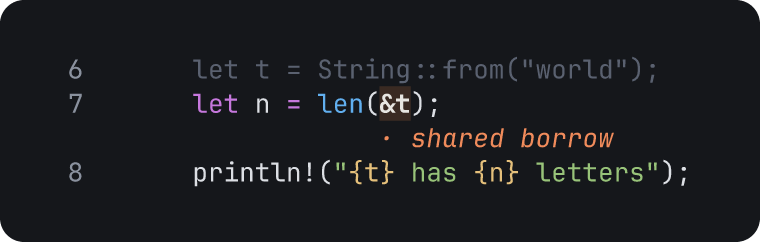
examples/ownership.rs, lines 6 to 8
:hl 7:&t shared borrow
:spot 7-8
Open lines 6 to 8 of examples/ownership.rs: tiza examples/ownership.rs:6-8 --no-save. Then type the commands.
:spot with an id
A spotlight with only an id dims all the code, except the code of that annotation. It also dims the other annotations. A dimmed mark keeps its label.
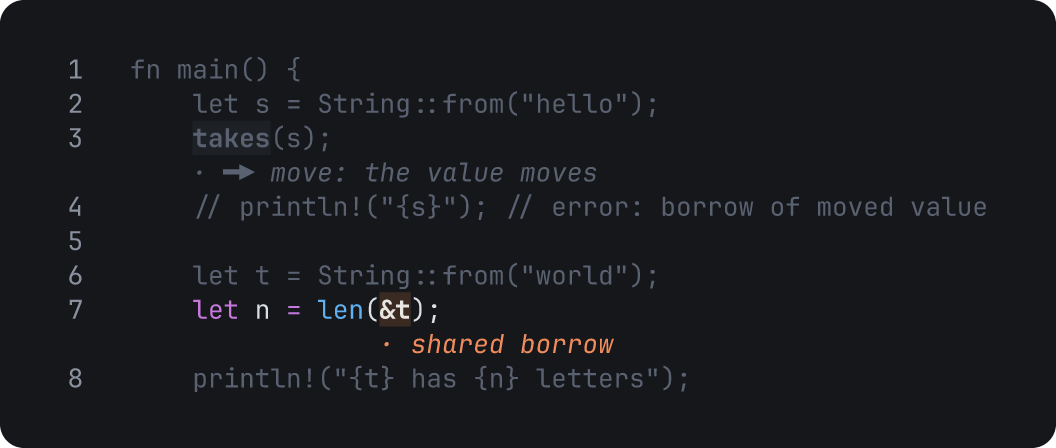
examples/ownership.rs, lines 1 to 8
:hl 7:&t shared borrow
:mark move 3:takes the value moves
:spot a1
Open lines 1 to 8 of examples/ownership.rs: tiza examples/ownership.rs:1-8 --no-save. Then type the commands.
Notes on :spot
:spot ID…adds a spotlight on the annotations that you name. The fields are inspotlight.- A spotlight draws nothing. It only dims.
- An annotation that touches the lines keeps its color, for example an arrow from a line outside to a line inside. See Rules for annotations.
- A line range and the ids can come in any order. A marker range must come first, for example
:spot @'fn len'..@'}'. - A word that starts with a digit is a line range. When you give two line ranges, Tiza uses the last one.
:spot .reads.as an id, not as the cursor line.
:until
Keeps a spotlight active up to a later step.
:until ID NFor example, :until a2 4 keeps the spotlight a2 active from its step to step 4.
Ncannot be before the step of the spotlight.
This frame is animated, from step 1 to step 3. The spotlight a1 starts at step 1, and :until a1 2 keeps it active at step 2. At step 3 it is not active:
examples/ownership.rs, lines 6 to 8
:spot 6-7
:note 8 t is still here
:step a2 2
:note 6 t owns its String
:step a3 3
:until a1 2
Open lines 6 to 8 of examples/ownership.rs: tiza examples/ownership.rs:6-8 --no-save. Then type the commands.
:style
Defines a mark style, changes it, or removes it.
:style NAME glyph=G legend="TEXT" color=C
:style NAME
:styleglyph=G-
The glyph of the mark.
legend="TEXT"-
The legend next to the glyph. Put text with spaces in
"quotes. color=C-
The color of the mark.
The names are in Color names.
For example, define the style io and use it in a mark:
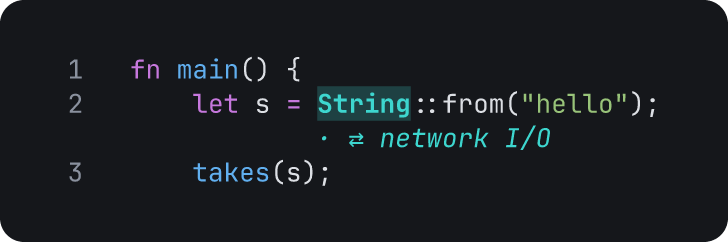
examples/ownership.rs, lines 1 to 3
:style io glyph=⇄ legend="network I/O" color=cyan
:mark io 2:String
Open lines 1 to 3 of examples/ownership.rs: tiza examples/ownership.rs:1-3 --no-save. Then type the commands.
Notes on :style
:style NAMEremoves the style. WhenNAMEis not a style, Tiza shows the usage.:stylealone shows the styles, the personal styles of the config file that the document does not have, and the built-in kinds.- A style is a custom kind. Tiza saves it in the document.